
VRRP
| Document revision: | 1.5 (Mon Jul 10 16:51:20 GMT 2006) |
| Applies to: | V2.9 |
General Information
Summary
Virtual Router Redundancy Protocol (VRRP) implementation in the MikroTik RouterOS is RFC2338 compliant. VRRP protocol is used to ensure constant access to some resources. Two or more routers (referred as VRRP Routers in this context) create a highly available cluster (also referred as Virtual routers) with dynamic fail over. Each router can participate in not more than 255 virtual routers per interface. Many modern routers support this protocol.
Network setups with VRRP clusters provide high availability for routers without using clumsy ping-based scripts.
Specifications
Packages required: systemLicense required: Level1
Submenu level: /ip vrrp
Standards and Technologies: VRRP, AH, HMAC-MD5-96 within ESP and AH
Hardware usage: Not significant
Related Documents
Description
Virtual Router Redundancy Protocol is an election protocol that provides high availability for routers. A number of routers may participate in one or more virtual routers. One or more IP addresses may be assigned to a virtual router. A node of a virtual router can be in one of the following states:
- MASTER state, when the node answers all the requests to the instance's IP addresses. There may only be one MASTER node in a virtual router. This node sends VRRP advertisement packets to all the backup routers (using multicast address) every once in a while (set in interval property).
- BACKUP state, when the VRRP router monitors the availability and state of the Master Router. It does not answer any requests to the instance's IP addresses. Should master become unavailable (if at least three sequential VRRP packets are lost), election process happens, and new master is proclaimed based on its priority. For more details on virtual routers, see RFC2338.
Notes
VRRP does not currently work on VLAN interfaces, as it is impossible to have the MAC address of a VLAN interface different from the MAC address of the physical interface it is put on.
VRRP Routers
Submenu level: /ip vrrpDescription
A number of VRRP routers may form a virtual router. The maximal number of clusters on one network is 255 each having a unique VRID (Virtual Router ID). Each router participating in a VRRP cluster must have it priority set to a valid value.
Property Description
authentication (none | simple | ah; default: none) - authentication method to use for VRRP advertisement packetssimple - plain text authentication
ah - Authentication Header using HMAC-MD5-96 algorithm
yes - the master node always has the priority
Notes
All the nodes of one cluster must have the same vrid, interval, preemption-mode, authentication and password.
As said before, priority of 255 is reserved for the real owner of the virtual router's IP addresses. Theoretically, the owner should have the IP address added statically to its IP address list and also to the VRRP virtual address list, but you should never do this! Any addresses that you are using as virtual addresses (i.e. they are added in /ip vrrp address) must not appear in /ip address list as they otherwise can cause IP address conflict, which will not be resolved automatically.
Also You must have an IP address (no matter what) on the interface you want to run VRRP on.
To add a VRRP instance on ether1 interface, forming (because priority is 255) a virtual router with vrid of 1:
[admin@MikroTik] ip vrrp> add interface=ether1 vrid=1 priority=255
[admin@MikroTik] ip vrrp> print
Flags: X - disabled, I - invalid, M - master, B - backup
  0  I  name="vr1" interface=ether1 vrid=1 priority=255 interval=1
        preemption-mode=yes authentication=none password="" on-backup=""
        on-master=""

[admin@MikroTik] ip vrrp>
Virtual IP addresses
Submenu level: /ip vrrp addressProperty Description
address (IP address) - IP address belongs to the virtual routerbroadcast (IP address) - broadcasting IP addressinterface (name; default: default) - interface, where to put the address on (may be different form the interface this VRRP instance is running on)Notes
The virtual IP addresses should be the same for each node of a virtual router.
To add a virtual address of 192.168.1.1/24 to the vr1 VRRP router:
[admin@MikroTik] ip vrrp> address add address=192.168.1.1/24 \
\... virtual-router=vr1
[admin@MikroTik] ip vrrp> address print
Flags: X - disabled, A - active
 #    ADDRESS            NETWORK         BROADCAST       INSTANCE INTERFACE
 0    192.168.1.1/24     192.168.1.0     192.168.1.255   vr1      default

[admin@MikroTik] ip vrrp>
A simple example of VRRP fail over
Description
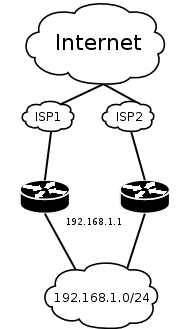
This example shows how to configure VRRP on the two routers shown on the diagram. The routers must have initial configuration: interfaces are enabled, each interface have appropriate IP address (note that each of the two interfaces should have an IP address), routing table is set correctly (it should have at least a default route). SRC-NAT or masquerading should also be configured before. See the respective manual chapters on how to make this configuration.
We will assume that the interface the 192.168.1.0/24 network is connected to is named local on both VRRP routers
Configuring Master VRRP router
First of all we should create a VRRP instance on this router. We will use the priority of 255 for this router as it should be preferred router.
[admin@MikroTik] ip vrrp> add interface=local priority=255
[admin@MikroTik] ip vrrp> print
Flags: X - disabled, I - invalid, M - master, B - backup
  0   M name="vr1" interface=local vrid=1 priority=255 interval=1
        preemption-mode=yes authentication=none password="" on-backup=""
        on-master=""

[admin@MikroTik] ip vrrp>
Next the virtual IP address should be added to this VRRP instance
[admin@MikroTik] ip vrrp> address add address=192.168.1.1/24 \
\... virtual-router=vr1
[admin@MikroTik] ip vrrp> address print
Flags: X - disabled, A - active
 #    ADDRESS            NETWORK         BROADCAST       INSTANCE INTERFACE
 0    192.168.1.1/24     192.168.1.0     192.168.1.255   vr1      default

[admin@MikroTik] ip vrrp>
Now this address should appear in /ip address list:
[admin@MikroTik] ip address> print
Flags: X - disabled, I - invalid, D - dynamic
  #   ADDRESS            NETWORK         BROADCAST       INTERFACE
  0   10.0.0.1/24        10.0.0.0        10.0.0.255      public
  1   192.168.1.2/24     192.168.1.0     192.168.1.255   local
  2 D 192.168.1.1/24     192.168.1.0     192.168.1.255   local

[admin@MikroTik] ip address>
Configuring Backup VRRP router
Now we will create VRRP instance with lower priority (we can use the default value of 100), so this router will back up the preferred one:
[admin@MikroTik] ip vrrp> add interface=local
[admin@MikroTik] ip vrrp> print
Flags: X - disabled, I - invalid, M - master, B - backup
  0   B name="vr1" interface=local vrid=1 priority=100 interval=1
        preemption-mode=yes authentication=none password="" on-backup=""
        on-master=""

[admin@MikroTik] ip vrrp>
Now we should add the same virtual address as was added to the master node:
[admin@MikroTik] ip vrrp> address add address=192.168.1.1/24 \
\... virtual-router=vr1
[admin@MikroTik] ip vrrp> address print
Flags: X - disabled, A - active
 #    ADDRESS            NETWORK         BROADCAST       INSTANCE INTERFACE
 0    192.168.1.1/24     192.168.1.0     192.168.1.255   vr1      default

[admin@MikroTik] ip vrrp>
Note that this address will not appear in /ip address list:
[admin@MikroTik] ip address> print
Flags: X - disabled, I - invalid, D - dynamic
  #   ADDRESS            NETWORK         BROADCAST       INTERFACE
  0   10.1.0.1/24        10.0.0.0        10.0.0.255      public
  1   192.168.1.3/24     192.168.1.0     192.168.1.255   local

[admin@MikroTik] ip address>
Testing fail over
Now, when we will disconnect the master router, the backup one will switch to the master state:
[admin@MikroTik] ip vrrp> print
Flags: X - disabled, I - invalid, M - master, B - backup
  0   M name="vr1" interface=local vrid=1 priority=100 interval=1
        preemption-mode=yes authentication=none password="" on-backup=""
        on-master=""

[admin@MikroTik] ip vrrp> /ip address print
Flags: X - disabled, I - invalid, D - dynamic
  #   ADDRESS            NETWORK         BROADCAST       INTERFACE
  0   10.1.0.1/24        10.0.0.0        10.0.0.255      public
  1   192.168.1.3/24     192.168.1.0     192.168.1.255   local
  2 D 192.168.1.1/24     192.168.1.0     192.168.1.255   local

[admin@MikroTik] ip vrrp>