
Bandwidth Control
| Document revision: | 1.5 (Fri Feb 03 15:15:03 GMT 2006) |
| Applies to: | V2.9 |
General Information
Summary
Bandwidth Control is a set of mechanisms that control data rate allocation, delay variability, timely delivery, and delivery reliability. The MikroTik RouterOS supports the following queuing disciplines:
- PFIFO - Packets First-In First-Out
- BFIFO - Bytes First-In First-Out
- SFQ - Stochastic Fairness Queuing
- RED - Random Early Detect
- PCQ - Per Connection Queue
- HTB - Hierarchical Token Bucket
Specifications
Packages required: systemLicense required: Level1 (limited to 1 queue) , Level3
Submenu level: /queue
Standards and Technologies: None
Hardware usage: significant
Related Documents
Description
Quality of Service (QoS) means that the router should prioritize and shape network traffic. QoS is not so much about limiting, it is more about providing quality. Below are listed the some features of MikroTik RouterOS Bandwidth Control mechanism:
- limit data rate for certain IP adresses, subnets, protocols, ports, and other parameters
- limit peer-to-peer traffic
- prioritize some packet flows over others
- use queue bursts for faster WEB browsing
- apply queues on fixed time intervals
- share available traffic among users equally, or depending on the load of the channel
The queuing is applied on packets leaving the router through a real interface (i.e., the queues are applied on the outgoing interface, regarding the traffic flow), or any of the 3 additional virtual interfaces (global-in, global-out, global-total).
The QoS is performed by means of dropping packets. In case of TCP protocol, the dropped packets will be resent so there is no need to worry that with shaping we lose some TCP information.
The main terms used to describe the level of QoS for network applications, are:
- queuing discipline (qdisc) - an algorithm that holds and maintains a queue of packets. It specifies the order of the outgoing packets (it means that queuing discipline can reorder packets) and which packets to drop if there is no space for them
- CIR (Committed Information Rate) - the guaranteed data rate. It means that traffic rate, not exceeding this value should always be delivered
- MIR (Maximal Information Rate) - the maximal data rate router will provide
- Priority - the order of importance in what traffic will be processed. You can give priority to some traffic in order it to be handeled before some other traffic
- Contention Ratio - the ratio to which the defined data rate is shared among users (when data rate is allocated to a number of subscribers). It is the number of subscribers that have a single speed limitation, applied to all of them together. For example, the contention ratio of 1:4 means that the allocated data rate may be shared between no more than 4 users
Before sending data over an interface, it is processed with a queuing discipline. By default, queuing disciplines are set under /queue interface for each physical interface (there is no default queuing discipline for virtual interfaces). Once we add a queue (in /queue tree) to a physical interface, the interface default queue, defined in /queue interface, for that particular interface gets ignored. It means - when a packet does not match any filter, it is sent through the interface with the highest priority.
Scheduler and Shaper qdiscsWe can classify queuing disciplines by their influence to packet flow:
- schedulers - queuing disciplines only reschedule packets regarding their algorithm and drop packets which 'do not fit in the queue'. Scheduler queuing disciplines are: PFIFO, BFIFO, SFQ, PCQ, RED
- shapers - queuing disciplines that also perform the limitation. Shapers are PCQ and HTB
There are 3 virtual interfaces in RouterOS, in addition to real interfaces:
- global-in - represents all the input interfaces in general (INGRESS queue). Please note that queues attached to global-in apply to traffic that is received by the router, before the packet filtering. global-in queueing is executed just after mangle and dst-nat
- global-out - represents all the output interfaces in general. Queues attached to it apply before the ones attached to a specific interface
- global-total - represents a virtual interface through which all the data, going through the router, is passing. When attaching a qdisc to global-total, the limitation is done in both directions. For example, if we set a total-max-limit to 256000, we will get upload+download=256kbps (maximum)
HTB (Hierarchical Token Bucket) is a classful queuing discipline that is useful for applying different handling for different kinds of traffic. Generally, we can set only one queue for an interface, but in RouterOS queues are attached to the main Hierarchical Token Bucket (HTB) and thus have some properties derived from that parent queue. For example, we can set a maximum data rate for a workgroup and then distribute that amount of traffic between the members of that workgroup.
HTB qdisc in detail:

HTB terms:
- queuing discipline (qdisc) - an algorithm that holds and maintains a queue of packets. It specifies the order of the outgoing packets (it means that queuing discipline can reorder packets). Qdisc also decides which packets to drop if there is no space for them
- filter - a procedure that classifies packets. The filter is responsible for classifying packets so that they are put in the corresponding qdiscs
- level - position of a class in the hierarchy
- inner class - a class that has one or more child-classes attached to it. Inner classes do not store any packets, but they do traffic shaping. The class also does not have its own priority
- leaf class - a class that has a parent but does not have any child-classes. Leaf classes are always located at level 0 of the hierarchy. Each leaf class has a qdisc, attached to it
- self feed - an object that represents the exit for the packets from all the classes active at its level of the hierarchy. It consists of 8 self slots
- self slot - an element of a self feed that corresponds to each particular priority. All classes, active at the same level, of one priority are attached to one self slot that they are using to send packets out through
- active class (at a particular level) - a class that is attached to a self slot at the given level
- inner feed - similar to self feed object, which consists of inner self slots, present on each inner class
- inner feed slot - similar to self slot. Each inner feed consists of inner slots which represent a priority
Each class has a parent and may have one or more children. Classes that do not have children, are put at level 0, where queues are maintained, and are called 'leaf classes'
Each class in the hierarchy can prioritize and shape traffic. There are 2 main parameters in RouterOS which refer to shaping and one - to prioritizing:
- limit-at - data rate that is guaranteed to a class (CIR)
- max-limit - maximal data rate that is allowed for a class to reach (MIR)
- priority - order in which classes are served at the same level (8 is the lowest priority, 1 is the highest)
Each HTB class can be in one of 3 states, depending on data rate that it consumes:
- green - a class the actual rate of which is equal or less than limit-at. At this state, the class is attached to self slot at the corresponding priority at its level, and is allowed to satisfy its limit-at limitation regardless of what limitations its parents have. For example, if we have a leaf class with limit-at=512000 and its parent has max-limit=limit-at=128000, the class will get its 512kbps!
- yellow - a class the actual rate of which is greater than limit-at and equal or less than max-limit. At this state, the class is attached to the inner slot of the corresponding priority of its parent's inner feed, which, in turn, may be attached to either its parent's inner slot of the same priority (in case the parent is also yellow), or to its own level self slot of the same priority (in case the parent is green). Upon the transition to this state, the class 'disconnects' from self feed of its level, and 'connects' to its parent's inner feed
- red - a class the actual rate of which exceeds max-limit. This class cannot borrow rate from its parent class
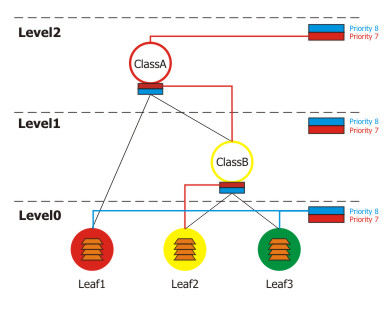
When a leaf class wants to send some traffic (as they are the only classes that hold packets), HTB checks its priority. It will begin with the highest priority and the lowest level and proceed until the lowest priority at highest level is reached:
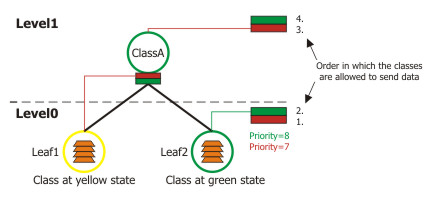
As you can see from the picture, leaf-classes which are at the green state, will always have a higher priority than those which are borrowing because their priority is at a lower level (level0). In this picture, Leaf1 will be served only after Leaf2, although it has a higher priority (7) than Leaf1 (8).
In case of equal priorities and equal states, HTB serves these classes, using round robin algorithm.
HTB ExamplesHere are some examples on how the HTB works.
Imagine the following scenario - we have 3 different kinds of traffic, marked in /ip firewall mangle (packet_mark1, packet_mark2 and packet_mark3), and now have bulit a HTB hierarchy:
[admin@MikroTik] queue tree> add name=ClassA parent=Local max-limit=2048000
[admin@MikroTik] queue tree> add name=ClassB parent=ClassA max-limit=1024000
[admin@MikroTik] queue tree> add name=Leaf1 parent=ClassA max-limit=2048000 \
\... limit-at=1024000 packet-mark=packet_mark1 priority=8
[admin@MikroTik] queue tree> add name=Leaf2 parent=ClassB max-limit=1024000 \
\... limit-at=256000 packet-mark=packet_mark2 priority=7
[admin@MikroTik] queue tree> add name=Leaf3 parent=ClassB max-limit=1024000 \
\... limit-at=768000 packet-mark=packet_mark3 priority=8
[admin@MikroTik] queue tree> print
Flags: X - disabled, I - invalid
 0   name="ClassA" parent=Local packet-mark="" limit-at=0 queue=default
     priority=8 max-limit=2048000 burst-limit=0 burst-threshold=0
     burst-time=0s

 1   name="ClassB" parent=ClassA packet-mark="" limit-at=0 queue=default
     priority=8 max-limit=1024000 burst-limit=0 burst-threshold=0
     burst-time=0s

 2   name="Leaf1" parent=ClassA packet-mark=packet_mark1 limit-at=1024000
     queue=default priority=8 max-limit=2048000 burst-limit=0
     burst-threshold=0 burst-time=0s

 3   name="Leaf2" parent=ClassB packet-mark=packet_mark2 limit-at=256000
     queue=default priority=7 max-limit=1024000 burst-limit=0
     burst-threshold=0 burst-time=0s

 4   name="Leaf3" parent=ClassB packet-mark=packet_mark3 limit-at=768000
     queue=default priority=8 max-limit=1024000 burst-limit=0
     burst-threshold=0 burst-time=0s
[admin@MikroTik] queue tree>
Now let us describe some scenarios, using this HTB hierarchy.
Imagine a situation when there have packets arrived at Leaf1 and Leaf2. Because of this, Leaf1 attaches itself to this level's (Level 0) self slot with priority=8 and Leaf2 attaches to self slot with priority=7. Leaf3 has nothing to send, so it does nothing.
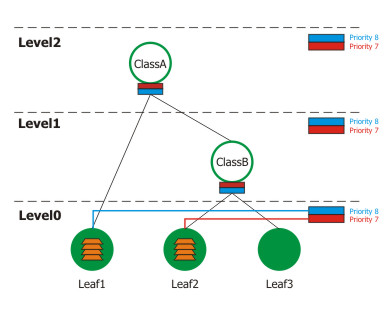
This is a simple situation: there are active classes (Leaf1 and Leaf2) at Level 0, and as they both are in green state, they are processed in order of their priorities - at first, we serve Leaf2, then Leaf1.
-
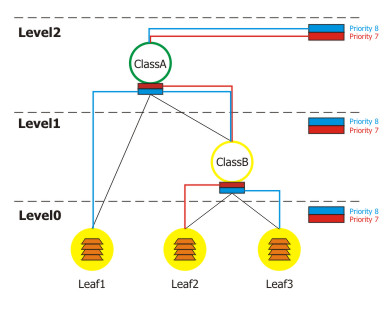
Now assume that Leaf2 has to send more than 256kbps, for this reason, it attaches itself to its parent's (ClassB) inner feed, which recursively attaches itself to Level1 self slot at priority=7. Leaf1 continues to be at green state - it has to send packets, but not faster than 1Mbps. Leaf3 still has nothing to send.
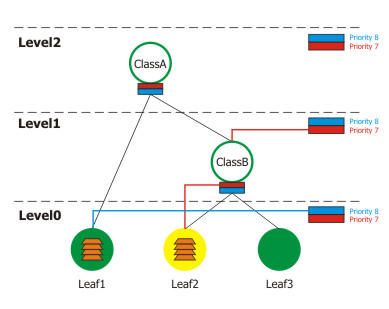
This is a very interesting situation because Leaf1 gets a higher priority than Leaf2 (when it is in the green state), although we have configured it for a lower priority (8) than Leaf2. It is because Leaf2 has disconnected itself from self feed at Level 0 and now is borrowing from its parent (ClassB) which has attached to self feed at Level 1. And because of this, the priority of Leaf2 'has traveled to Level1'. Remember that at first, we serve those classes which are at the lowest level with the highest priority, then continuing with the next level, and so on.
-
Consider that Leaf1 has reached its max-limit and changed its state to red, and Leaf2 now uses more than 1Mbps (and less than 2Mbps), so its parent ClassB has to borrow from ClassA and becomes yellow. Leaf3 still has no packets to send.
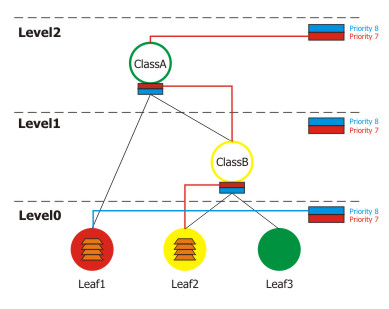
This scenario shows that Leaf1 has reached its max-limit, and cannot even borrow from its parent (ClassA). Leaf2 has hierarchical reached Level2 and borrows from ClassB which recursively must borrow from ClassA because it has not enough rate available. As Leaf3 has no packets to send, the only one class who sends them, is Leaf2.
-
Assume that Leaf2 is borrowing from ClassB, ClassB from ClassA, but ClassA reaches its max-limit (2Mbps).
In this situation Leaf2 is in yellow state, but it cannot borrow (as Class B cannot borrow from Class A).
-
Finally, let's see what happens, if Leaf1, Leaf2, Leaf3 and ClassB are in the yellow state, and ClassA is green.
Leaf1 borrows from ClassA, Leaf2 and Leaf3 from ClassB, and ClassB also borrows from ClassA. Now all the priorities have 'moved' to Level2. So Leaf2 is on the highest priority and is served at first. As Leaf1 and Leaf3 are at the same priority (8) on the same level (2), they are served, using the round robin algorithm.


Bursts are used to allow higher data rates for a short period of time. Every 1/16 part of the burst-time, the router calculates the average data rate of each class over the last burst-time seconds. If this average data rate is less than burst-threshold, burst is enabled and the actual data rate reaches burst-limit bps, otherwise the actual data rate falls to max-limit or limit-at.
Let us consider that we have a setup, where max-limit=256000, burst-time=8, burst-threshold=192000 and burst-limit=512000. When a user is starting to download a file via HTTP, we can observe such a situation:

At the beginning the average data rate over the last 8 seconds is 0bps because before applying the queue rule no traffic was passed, using this rule. Since this average data rate is less than burst-threshold (192kbps), burst is allowed. After the first second, the average data rate is (0+0+0+0+0+0+0+512)/8=64kbps, which is under burst-threshold. After the second second, average data rate is (0+0+0+0+0+0+512+512)/8=128kbps. After the third second comes the breakpoint when the average data rate becomes larger than burst-threshold. At this moment burst is disabled and the current data rate falls down to max-limit (256kbps).
HTB in RouterOSThere are 4 HTB trees maintained by RouterOS:
- global-in
- global-total
- global-out
- interface queue
When adding a simple queue, it creates 3 HTB classes (in global-in, global-total and global-out), but it does not add any classes in interface queue.
Queue tree is more flexible - you can add it to any of these HTB's.
When packet travels through the router, it passesall 4 HTB trees - global-in, global-total, global-out and interface queue. If it is directed to the router, it passes global-in and global-total HTB queues. If packets are sent from the router, they are traversing global-total, global-out and interface queues
Additional Resources
Queue Types
Submenu level: /queue typeDescription
In this submenu you can create your custom queue types. Afterwards, you will be able to use them in /queue tree, /queue simple or /queue interface.
PFIFO and BFIFOThese queuing disciplines are based on the FIFO algorithm (First-In First-Out). The difference between PFIFO and BFIFO is that one is measured in packets and the other one in bytes. There is only one parameter called pfifo-limit (bfifo-limit) which defines how much data a FIFO queue can hold. Every packet that cannot be enqueued (if the queue is full), is dropped. Large queue sizes can increase latency.
Use FIFO queuing disciplines if you haven't a congested link
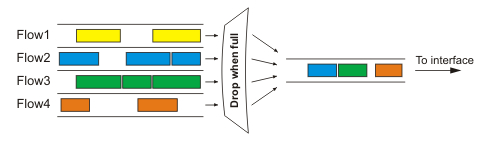
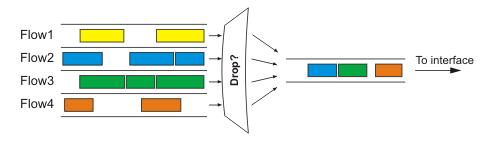
SFQStochastic Fairness Queuing (SFQ) cannot limit traffic at all. Its main idea is to equalize traffic flows (TCP sessions or UDP streams) when your link is completely full.
The fairness of SFQ is ensured by hashing and round-robin algorithms. Hashing algorithm divides the session traffic over a limited number of subqueues. After sfq-perturb seconds the hashing algorithm changes and divides the session traffic to other subqueues. The round-robin algorithm dequeues pcq-allot bytes from each subqueue in a turn.
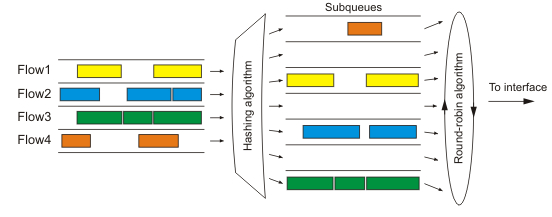
The whole SFQ queue can contain 128 packets and there are 1024 subqueues available for these packets.
Use SFQ for congested links to ensure that some connections do not starve
PCQTo solve some SFQ imperfectness, Per Connection Queuing (PCQ) was created. It is the only classless queuing type that can do limitation. It is an improved version of SFQ without its stohastic nature. PCQ also creates subqueues, regarding the pcq-classifier parameter. Each subqueue has a data rate limit of pcq-rate and size of pcq-limit packets. The total size of a PCQ queue cannot be greater than pcq-total-limit packets.
The following example demonstrates the usage of PCQ with packets, classified by their source address.
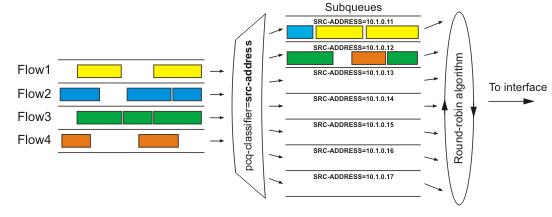
If you classify the packets by src-address then all packets with different source IP addresses will be grouped into different subqueues. Now you can do the limitation or equalization for each subqueue with the pcq-rate parameter. Perhaps, the most significant part is to decide to which interface should we attach this queue. If we will attach it to the Local interface, all traffic from the Public interface will be grouped by src-address (probably it's not what we want), but if we attach it to the Public interface, all traffic from our clients will be grouped by src-address - so we can easily limit or equalize upload for clients.
To equalize rate among subqueues, classified by the pcq-classifier, set the pcq-rate to 0!
PCQ can be used to dynamically equalize or shape traffic for multiple users, using little administration.
REDRandom Early Detection is a queuing mechanism which tries to avoid network congestion by controlling the average queue size. When the average queue size reaches red-min-threshold, RED randomly chooses which arriving packet to drop. The probability how many packets will be dropped increases when the average queue size becomes larger. If the average queue size reaches red-max-threshold, the packets are dropped. However, there may be cases when the real queue size (not average) is much greater than red-max-threshold, then all packets which exceed red-limit are dropped.
Mainly, RED is used on congested links with high data rates. Works well with TCP protocol, but not so well with UDP.
Property Description
bfifo-limit (integer; default: 15000) - maximum number of bytes that the BFIFO queue can holdkind (bfifo | pcq | pfifo | red | sfq) - which queuing discipline to usepcq - Per Connection Queue
pfifo - Packets First-In, First-Out
red - Random Early Detection
sfq - Stohastic Fairness Queuing
Interface Default Queues
Submenu level: /queue interfaceDescription
In order to send packets over an interface, they have to be enqueued in a queue even if you do not want to limit traffic at all. Here you can specify the queue type which will be used for transmitting data.
Note that if other queues are applied for a particular packet, then these settings are not used!
Property Description
interface (read-only: name; default: name of the interface) - name of the interfacequeue (name; default: default) - queue type which will be used for the interfaceExample
Set the wireless interface to use wireless-default queue:
[admin@MikroTik] queue interface> set 0 queue=wireless-default
[admin@MikroTik] queue interface> print
 # INTERFACE QUEUE
 0 wlan1     wireless-default
[admin@MikroTik] queue interface>
Simple Queues
Description
The simpliest way to limit data rate for specific IP addresses and/or subnets, is to use simple queues.
You can also use simple queues to build advanced QoS applications. They have useful integrated features:
- Peer-to-peer traffic queuing
- Applying queue rules on chosen time intervals
- Priorities
- Using multiple packet marks from /ip firewall mangle
- Shaping of bidirectional traffic (one limit for the total of upload + download)
Property Description
burst-limit (integer/integer) - maximum data rate which can be reached while the burst is active in form of in/out (target upload/download)burst-threshold (integer/integer) - used to calculate whether to allow burst. If the average data rate over the last burst-time seconds is less than burst-threshold, the actual data rate may reach burst-limit. set in form of in/out (target upload/download)burst-time (integer/integer) - used to calculate average data rate, in form of in/out (target upload/download)direction (none both upload download) - traffic flow directions, affected by this queueboth - the queue limits both target upload and target download
upload - the queue limits only target upload, leaving the download rates unlimited
download - the queue limits only target download, leaving the upload rates unlimited
any - match any packet (i.e., do not check this property)
Queue Trees
Submenu level: /queue treeDescription
The queue trees should be used when you want to use sophisticated data rate allocation based on protocols, ports, groups of IP addresses, etc. At first you have to mark packet flows with a mark under /ip firewall mangle and then use this mark as an identifier for packet flows in queue trees.
Property Description
burst-limit (integer) - maximum data rate which can be reached while the burst is activeburst-threshold (integer) - used to calculate whether to allow burst. If the average data rate over the last burst-time seconds is less than burst-threshold, the actual data rate may reach burst-limit burst-time (time) - used to calculate average data rateflow (text) - packet flow which is marked in /ip firewall mangle. Current queue parameters apply only to packets which are marked with this flow marklimit-at (integer) - guaranteed data rate to this queuemax-limit (integer) - data rate which can be reached if there is enough bandwidth availablename (text) - descriptive name for the queueparent (text) - name of the parent queue. The top-level parents are the available interfaces (actually, main HTB). Lower level parents can be other queuespriority (integer: 1..8) - priority of the queue. 1 is the highest, 8 - the lowestqueue (text) - name of the queue type. Types are defined under /queue type. This parameter applies only to the leaf queues in the tree hierarchyApplication Examples
Example of emulating a 128Kibps/64Kibps Line
Assume, we want to emulate a 128Kibps download and 64Kibps upload line, connecting IP network 192.168.0.0/24. The network is served through the Local interface of customer's router. The basic network setup is in the following diagram:

To solve this situation, we will use simple queues.
IP addresses on MikroTik router:
[admin@MikroTik] ip address> print
Flags: X - disabled, I - invalid, D - dynamic
 #   ADDRESS            NETWORK         BROADCAST       INTERFACE
 0   192.168.0.254/24     192.168.0.0     192.168.0.255   Local
 1   10.5.8.104/24      10.5.8.0        10.5.8.255      Public
[admin@MikroTik] ip address>
And routes:
[admin@MikroTik] ip route> print
Flags: X - disabled, A - active, D - dynamic,
C - connect, S - static, r - rip, b - bgp, o - ospf
 #     DST-ADDRESS        G GATEWAY         DISTANCE INTERFACE
 0 ADC 10.5.8.0/24                                   Public
 1 ADC 192.168.0.0/24                                Local
 2 A S 0.0.0.0/0          r 10.5.8.1                 Public
[admin@MikroTik] ip route>
Add a simple queue rule, which will limit the download traffic to 128Kib/s and upload to 64Kib/s for clients on the network 192.168.0.0/24, served by the interface Local:
[admin@MikroTik] queue simple> add name=Limit-Local interface=Local \
\... target-address=192.168.0.0/24 max-limit=65536/131072
[admin@MikroTik] queue simple> print
Flags: X - disabled, I - invalid, D - dynamic
 0    name="Limit-Local" target-addresses=192.168.0.0/24 dst-address=0.0.0.0/0
      interface=Local parent=none priority=8 queue=default/default
      limit-at=0/0 max-limit=65536/131072 total-queue=default
[admin@MikroTik] queue simple>
The max-limit parameter cuts down the maximum available bandwidth. From the clients' point of view, the value 65536/131072 means that they will get maximum of 131072bps for download and 65536bps for upload. The target-addresses parameter defines the target network (or networks, separated by a comma) to which the queue rule will be applied.
Now see the traffic load:
[admin@MikroTik] interface> monitor-traffic Local
  received-packets-per-second: 7
       received-bits-per-second: 68kbps
        sent-packets-per-second: 13
           sent-bits-per-second: 135kbps

[admin@MikroTik] interface>
Probably, you want to exclude the server from being limited, if so, add a queue for it without any limitation (max-limit=0/0 which means no limitation) and move it to the beginning of the list:
[admin@MikroTik] queue simple> add name=Server target-addresses=192.168.0.1/32 \
\... interface=Local
[admin@MikroTik] queue simple> print
Flags: X - disabled, I - invalid, D - dynamic
 0    name="Limit-Local" target-addresses=192.168.0.0/24 dst-address=0.0.0.0/0
      interface=Local parent=none priority=8 queue=default/default
      limit-at=0/0 max-limit=65536/131072 total-queue=default

 1    name="Server" target-addresses=192.168.0.1/32 dst-address=0.0.0.0/0
      interface=Local parent=none priority=8 queue=default/default
      limit-at=0/0 max-limit=0/0 total-queue=default
[admin@MikroTik] queue simple> mo 1 0
[admin@MikroTik] queue simple> print
Flags: X - disabled, I - invalid, D - dynamic
 0    name="Server" target-addresses=192.168.0.1/32 dst-address=0.0.0.0/0
      interface=Local parent=none priority=8 queue=default/default
      limit-at=0/0 max-limit=0/0 total-queue=default

 1    name="Limit-Local" target-addresses=192.168.0.0/24 dst-address=0.0.0.0/0
      interface=Local parent=none priority=8 queue=default/default
      limit-at=0/0 max-limit=65536/131072 total-queue=default
[admin@MikroTik] queue simple>
Queue Tree Example With Masquerading
In the previous example we dedicated 128Kib/s download and 64Kib/s upload traffic for the local network. In this example we will guarantee 256Kib/s download (128Kib/s for the server, 64Kib/s for the Workstation and also 64Kib/s for the Laptop) and 128Kib/s for upload (64/32/32Kib/s, respectivelly) for local network devices. Additionally, if there is spare bandwidth, share it among users equally. For example, if we turn off the laptop, share its 64Kib/s download and 32Kib/s upload to the Server and Workstation.
When using masquerading, you have to mark the outgoing connection with new-connection-mark and take the mark-connection action. When it is done, you can mark all packets which belong to this connection with the new-packet-mark and use the mark-packet action.

-
At first, mark the Server's download and upload traffic. With the first rule we will mark the outgoing connection and with the second one, all packets, which belong to this connection:
[admin@MikroTik] ip firewall mangle> add src-address=192.168.0.1/32 \ \... action=mark-connection new-connection-mark=server-con chain=prerouting [admin@MikroTik] ip firewall mangle> add connection-mark=server-con \ \... action=mark-packet new-packet-mark=server chain=prerouting [admin@MikroTik] ip firewall mangle> print Flags: X - disabled, I - invalid, D - dynamic 0 chain=prerouting src-address=192.168.0.1 action=mark-connection new-connection-mark=server-con 1 chain=prerouting connection-mark=server-con action=mark-packet new-packet-mark=server [admin@MikroTik] ip firewall mangle> -
The same for Laptop and Workstation:
[admin@MikroTik] ip firewall mangle> add src-address=192.168.0.2 \
\... action=mark-connection new-connection-mark=lap_works-con chain=prerouting
[admin@MikroTik] ip firewall mangle> add src-address=192.168.0.3 \
\... action=mark-connection new-connection-mark=lap_works-con chain=prerouting
[admin@MikroTik] ip firewall mangle> add connection-mark=lap_works-con \
\... action=mark-packet new-packet-mark=lap_work chain=prerouting
[admin@MikroTik] ip firewall mangle> print
Flags: X - disabled, I - invalid, D - dynamic
 0   chain=prerouting src-address=192.168.0.1 action=mark-connection
     new-connection-mark=server-con

 1   chain=prerouting connection-mark=server-con action=mark-packet
     new-packet-mark=server

 2   chain=prerouting src-address=192.168.0.2 action=mark-connection
     new-connection-mark=lap_works-con

 3   chain=prerouting src-address=192.168.0.3 action=mark-connection
     new-connection-mark=lap_works-con

 4   chain=prerouting connection-mark=lap_works-con action=mark-packet
     new-packet-mark=lap_work
[admin@MikroTik] ip firewall mangle>
As you can see, we marked connections that belong for Laptop and Workstation with the same flow.
-
In /queue tree add rules that will limit Server's download and upload:
[admin@MikroTik] queue tree> add name=Server-Download parent=Local \
\... limit-at=131072 packet-mark=server max-limit=262144
[admin@MikroTik] queue tree> add name=Server-Upload parent=Public \
\... limit-at=65536 packet-mark=server max-limit=131072
[admin@MikroTik] queue tree> print
Flags: X - disabled, I - invalid
 0   name="Server-Download" parent=Local packet-mark=server limit-at=131072
     queue=default priority=8 max-limit=262144 burst-limit=0
     burst-threshold=0 burst-time=0s

 1   name="Server-Upload" parent=Public packet-mark=server limit-at=65536
     queue=default priority=8 max-limit=131072 burst-limit=0
     burst-threshold=0 burst-time=0s
[admin@MikroTik] queue tree>
And similar config for Laptop and Workstation:
[admin@MikroTik] queue tree> add name=Laptop-Wkst-Down parent=Local \
\... packet-mark=lap_work limit-at=65535 max-limit=262144
[admin@MikroTik] queue tree> add name=Laptop-Wkst-Up parent=Public \
\... packet-mark=lap_work limit-at=32768 max-limit=131072
[admin@MikroTik] queue tree> print
Flags: X - disabled, I - invalid
 0   name="Server-Download" parent=Local packet-mark=server limit-at=131072
     queue=default priority=8 max-limit=262144 burst-limit=0
     burst-threshold=0 burst-time=0s

 1   name="Server-Upload" parent=Public packet-mark=server limit-at=65536
     queue=default priority=8 max-limit=131072 burst-limit=0
     burst-threshold=0 burst-time=0s

 2   name="Laptop-Wkst-Down" parent=Local packet-mark=lap_work limit-at=65535
     queue=default priority=8 max-limit=262144 burst-limit=0
     burst-threshold=0 burst-time=0s

 3   name="Laptop-Wkst-Up" parent=Public packet-mark=lap_work limit-at=32768
     queue=default priority=8 max-limit=131072 burst-limit=0
     burst-threshold=0 burst-time=0s
[admin@MikroTik] queue tree>
Equal bandwidth sharing among users
This example shows how to equally share 10Mibps download and 2Mibps upload among active users in the network 192.168.0.0/24. If Host A is downloading 2 Mibps, Host B gets 8 Mibps and vice versa. There might be situations when both hosts want to use maximum bandwidth (10 Mibps), then they will receive 5 Mibps each, the same goes for upload. This setup is also valid for more than 2 users.

At first, mark all traffic, coming from local network 192.168.0.0/24 with a mark users:
/ip firewall mangle add chain=forward src-address=192.168.0.0/24 \
   action=mark-connection new-connection-mark=users-con
/ip firewall mangle add connection-mark=users-con action=mark-packet \
   new-packet-mark=users chain=forward
Now we will add 2 new PCQ types. The first, called pcq-download will group all traffic by destination address. As we will attach this queue type to the Local interface, it will create a dynamic queue for each destination address (user) which is downloading to the network 192.168.0.0/24. The second type, called pcq-upload will group the traffic by source address. We will attach this queue to the Public interface so it will make one dynamic queue for each user who is uploading to Internet from the local network 192.168.0.0/24.
/queue type add name=pcq-download kind=pcq pcq-classifier=dst-address
/queue type add name=pcq-upload kind=pcq pcq-classifier=src-address
Finally, make a queue tree for download traffic:
/queue tree add name=Download parent=Local max-limit=10240000
/queue tree add parent=Download queue=pcq-download packet-mark=users
And for upload traffic:
/queue tree add name=Upload parent=Public max-limit=2048000
/queue tree add parent=Upload queue=pcq-upload packet-mark=users
Note! If your ISP cannot guarantee you a fixed amount of traffic, you can use just one queue for upload and one for download, attached directly to the interface:
/queue tree add parent=Local queue=pcq-download packet-mark=users
/queue tree add parent=Public queue=pcq-upload packet-mark=users