HotSpot Gateway features:
It is recommended that you read General Point to Point Setting manual first since the authentication configuration is very similar.
Use the /system package print command to see the list of installed packages.
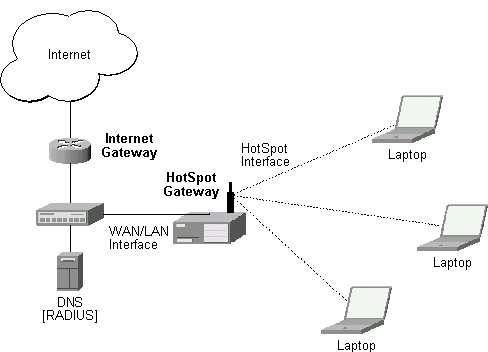
MikroTik HotSpot Gateway should have at least two network interfaces:
The diagram below shows sample HotSpot setup.
The HotSpot interface should have two IP addresses assigned to it: one as gateway for the temporary address pool prior to authentication, and second as gateway for the permanent address pool used for authenticated clients. Note, that you have to provide routing for these address pools, unless you plan to use masquerading (source NAT).
The arp feature should be set to 'reply-only' on HotSpot interface to prevent network access using static IP addresses. The DHCP server will add static ARP entries for each DHCP client.
Physical network connection has to be established between the HotSpot user's computer and the gateway. It can be wireless (the wireless card should register to AP), or wired (the NIC card should be connected to HUB).
MikroTik HotSpot Gateway's DHCP server assigns IP addresses from the temporary address pool with a very short lease time (approx. 14s), so the address can be changed after authentication.
If user tries to access network resources using web browser, the destination NAT rule redirects all TCP connection requests to HotSpot servlet (port 8080 by default). This brings up the HotSpot Welcome/Login page.
It may be useful to have port 80 for HotSpot servlet because the users might want to see status and log out. If this is impossible, you may redirect requests to a virtual IP address to the servlet.
Note that you may want to have DNS traffic enabled (or redirected to the router's DNS cache) so that the client could be logged in connecting any valid web-page (using it's DNS name). Enabling ICMP ping might be useful as well, since it shows network connectivity. Other traffic should be dropped.
If user is not logged in, login page will be shown (where username and password has to be entered), but if user is logged in, status page will be shown (status: username, IP address, session time, bytes and packets transferred, ...). There are 6 HTML pages that can be easily modified by creating HTML template pages and uploading them to the hotspot folder on MikroTik router. These pages are described in detailes later on.
After client computer receives temporary IP address from HotSpot DHCP server, going to any HTTP address with web browser will be redirected to HotSpot authentication page prompting for username and password. Password together with HotSpot generated challenge string is hashed using MD5 algorithm (which in this case is implemented using JavaScript) and is executed on client's computer by web browser. After that, the hash result together with username is sent over Ethernet network to HotSpot servlet. So, password is never sent in plain text over ip network.
HotSpot can authenticate users using local user database or some RADIUS server. Which option is used is determined by /ip hotspot radius-client enabled parameter. If radius client is enabled, RADIUS authentication is used, otherwise local user authentication is done. If authentication is done locally, profile corresponding to that user is used, otherwise (in case of RADIUS) default profile is used to set default values for parameters, which are not set in RADIUS access-accept message.
If authentication by http cookie is enabled, then after each successful login cookie is sent to web browser and the same cookie is added to active HTTP cookie list. Next time when user will try to log in, web browser will send http cookie. This cookie will be compared to the one on HotSpot and only if there is the same source MAC address and the same randomly generated ID, user is automatically logged in. New cookie with different random ID is sent to web browser. Old cookie is removed from local HotSpot active cookie list. New one with new expire time is added.
While IP address is changed, user sees after-login (alogin.html) page. This page will automatically forward user to original destination address (or status page, if there was no original dst address) after login-delay time will pass.
MikroTik HotSpot Gateway Setup
MikroTik HotSpot Gateway setup is under /ip hotspot submenu:
[admin@MikroTik] ip hotspot>
HotSpot management
         active  HotSpot active user list
           user  HotSpot local user list
        profile  HotSpot user profile management
         server  HotSpot DHCP profile management
  radius-client  RADIUS client configuration
         cookie  HotSpot active HTTP cookie list
          print  Print current configuration and status
            get  Get value of configuration property
            set  Change hotspot configuration
         export  Export hotspot settings
[admin@MikroTik] ip hotspot> print
         hotspot-address: 0.0.0.0
      status-autorefresh: 1m
                auth-mac: no
       auth-mac-password: no
        auth-http-cookie: no
    http-cookie-lifetime: 1d
These are general parameters for HotSpot:
auth-http-cookie - defines whether HTTP authentication by cookie is enabled
auth-mac - defines whether authentication by ethernet MAC address is enabled
auth-mac-password - uses MAC address as password if MAC authorization is enabled
hotspot-address - IP address for HotSpot www access
http-cookie-lifetime - validity time of HTTP cookies
status-autorefresh - WWW status page autorefresh time
[admin@MikroTik] ip hotspot radius-client> print
                enabled: no
             accounting: yes
         primary-server: 10.0.0.96
       secondary-server: 0.0.0.0
          shared-secret: "secret"
    authentication-port: 1812
        accounting-port: 1813
         interim-update: 5m
[admin@MikroTik] ip hotspot radius-client>
All parameters are the same as for ppp (/ppp radius-client):
accounting - enable or disable RADIUS accounting
accounting-port - IP port on RADIUS server for accounting
authentication-port - IP port on RADIUS server for authentication
enabled - defines whether RADIUS client is enabled
interim-update - Interim-Update time interval
primary-server - IP address of primary RADIUS server
secondary-server - IP address of secondary RADIUS server
shared-secret - shared secret of RADIUS server
NAS-Identifier		router identity

NAS-Port-Type		for HotSpot is Ethernet

Calling-Station-Id	client MAC address (with CAPITAL letters)

Called-Station-Id	Hotspot server name (from version 2.6.9)

NAS-Port-Id		Hotspot server name

User-Name		client login name

CHAP-Password,
CHAP-Challenge	        encrypted password and challenge
Framed-IP-Address	IP address given to client. If address is 255.255.255.254,
                        IP pool is used from hotspot settings. If
                        Framed-IP-Address is specified, Framed-Pool is ignored.

Framed-Pool		IP pool name (on the router) from which to get IP address
                        for the client

Idle-Timeout		idle-timeout parameter

Session-Timeout		session-timeout parameter

Framed-Route		routes to add on the server. Format is specified in
                        RFC2865 (Ch. 5.22), can be specified as many times as needed.
Filter-Id		firewall filter chain name. It is used to make dynamic
                        firewall rule that will jump to specified chain, if a
                        packet if come to or from the client. Firewall chain name
                        can have suffix .in or .out, that will install rule only
                        for incoming or outgoing traffic. Multiple filter-id can
                        be provided, but only last ones for incoming and outgoing is used.

Acct-Interim-Interval	interim-update for RADIUS client (used only if RADIUS
                        client does not have local interim-update setting).

Ascend-Data-Rate	tx/rx data rate limitation (for PPPoE).	If multiple
                        attributes are provided, first limits tx data rate,
                        second - rx data rate. 0 if unlimited.

Mikrotik-Recv-Limit	total recv limit in bytes for the client

Mikrotik-Xmit-Limit	total transmit limit in bytes for the client

Framed-IP-Netmask	client network netmask

Ascend-Client-Gatway	client gateway
Note that the received attributes override the default ones (set in the default profile), but if an attribute is not received from RADIUS server, the default one is to be used.
Acct-Status-Type	Satrt, Stop, or Interim-Update
Acct-Session-Id		accounting session ID
NAS-Identifier		same as in request
User-Name		same as in request
NAS-Port-Type		same as in request
NAS-Port-Id		same as in request
Calling-Station-Id	same as in request (from version 2.6.9)
Called-Station-Id	same as in request (from version 2.6.9)
Framed-IP-Address	IP address given to the user
RADIUS attributes additionally included in Stop and Interim-Update Accounting-Request packets:
Acct-Session-Time	connection uptime in seconds
Acct-Input-Octects	bytes received from the client
Acct-Input-Packets	packets received from the client
Acct-Output-Octets	bytes sent to the client
Acct-Output-Packets	packets sent to the client
Stop Accounting-Request packets can additionally have:
Acct-Terminate-Cause session termination cause (described in RFC2866 Ch. 5.10)
[admin@MikroTik] ip hotspot profile> print
Flags: * - default
  0 * name="default" session-timeout=0s idle-timeout=0s only-one=no
      tx-bit-rate=0 incoming-filter="" outgoing-filter=""
[admin@MikroTik] ip hotspot profile>
Most of these parameters are exactly the same as for /ppp profile:
name - profile name
session-timeout - session timeout for client
idle-timeout - idle timeout for client
only-one - only one simultaneous login per user (yes, no)
tx-bit-rate - transmit bitrate. '0' means no limitation
incoming-filter - firewall chain name for incoming packets
outgoing-filter - firewall chain name for outgoing packets
Default profile will be used in case of RADIUS authentication as well. RADIUS server argument for limiting the data rate (transmited to the client) is Ascend-Data-Rate (vendor id: 529, attribute id:197).
Note that filter rules 'jumping' to the specifies firewall chain are added automatically to the hotspot firewall chain. This means that you should create hotspot chain and pass some (or all) the packets to it in order filtering to function.
[admin@MikroTik] ip hotspot server> print
  0 name="dhcp1" dhcp-server=hotspot_dhcp lease-time=1m login-delay=14s
    address-pool=hotspot netmask=0.0.0.0 gateway=0.0.0.0

[admin@MikroTik] ip hotspot server>
Description of parameters:
address-pool - IP pool name, from which HotSpot client will get IP address if it is not given some static already
gateway - default gateway
lease-time - DHCP lease time for logged in user
login-delay - Time required to log in user
name - DHCP profile name, is sent as NAS-Port-Id by RADIUS client
netmask - network mask
dhcp-server - DHCP server with which to use this profile
[admin@MikroTik] ip hotspot user> print
Flags: X - disabled
  #   NAME          PASSWORD      ADDRESS         PROFILE       UPTIME
  0   ax            ex            10.0.0.3        default       29m40s
[admin@MikroTik] ip hotspot user> print detail
Flags: X - disabled
  0   name="ax" password="ex" address=10.0.0.3 profile=default routes=""
      limit-uptime=0s limit-bytes-in=0 limit-bytes-out=0 uptime=29m40s
      bytes-in=187476 packets-in=683 bytes-out=327623 packets-out=671
[admin@MikroTik] ip hotspot user>
Parameter description:
name - user name
password - user password
address - static IP address. If not 0.0.0.0, client will get always the same IP address. It implies, that only one simultaneous login for that user is allowed
profile - user profile
routes - user routes. Usage and meaning is exactly the same as for ppp
limit-bytes-in - maximum amount of bytes user can receive
limit-bytes-out - maximum amount of bytes user can transmit
limit-uptime - total uptime limit for user (pre-paid time)
If auth-mac parameter is enabled, clients' MAC addresses (written with CAPITAL letters) can be used as usernames. If auth-mac-password is set to no, there should be no password for that users. Else, the username and the password should be equal. When client is connecting, it's MAC address is checked first. If there is a user with that MAC address, the client is authorized as this user. If there is no match, client is asked for username and password.
The RADIUS attributes for limit-bytes-in and limit-bytes-out are Mikrotik-Recv-Limit (14988, 1) and Mikrotik-Xmit-Limit (14988, 2). These limits are total limits for each user (not for each session as at /ip hotspot active). So, if user has already downloaded something, then session limit will be total limit - (minus) already downloaded. For example, if download limit for user is 100MB and user has already downloaded 30MB, then session download limit after login at /ip hotspot active will be 100MB - 30MB = 70MB.
If user will reach his limits (bytes-in >= limit-bytes-in or bytes-out >= limit-bytes-out), he will not be able to log on anymore.
All these limits (limit-uptime, limit-bytes-in, limit-bytes-out) can be used for pre-paid solutions. Probably 'quota' is a good name for such limits.
Along with these parameters, some statistics are available for each user:
[admin@MikroTik] ip hotspot user> print stats
Flags: X - disabled
  #   NAME         UPTIME          BYTES-IN   BYTES-OUT  PACKETS-IN PACKETS-OUT
  0   ax           29m40s          187476     327623     683        671
[admin@MikroTik] ip hotspot user>
Statistics include:
uptime - total time user has been logged in
bytes-in - total bytes received from user
bytes-out - total bytes sent to user
packets-in - total packets received from user
packets-out - total packets sent to user
Note that these stats are updated each time user logs out and RADIUS accounting is disabled (or RADIUS is disabled). It means, that if user is currently logged in, then these stats will not show current total values. Use /ip hotspot active print stats to produce statistics on current user sessions.
The active user list shows the list of currently logged in users. Nothing can be changed here, except user can be removed with the remove command.
[admin@MikroTik] ip hotspot active> print
  # USER           ADDRESS         UPTIME          SESSION-TIMEOUT IDLE-TIMEOUT
  0 ex             10.0.0.204      6m10s
[admin@MikroTik] ip hotspot active>
Description of the printout:
user - name of user logged in
address - IP address of logged in user
uptime - current session time (logged in time) for this IP address
session-timeout - how much time it is left for IP address until it will be automatically logged out
idle-timeout - how much idle time it is left for IP address until it will be automatically logged out
Statistics about logged in user are available too:
[admin@MikroTik] ip hotspot active> print stats
  # USER           UPTIME          BYTES-IN   BYTES-OUT  PACKETS-IN PACKETS-OUT
  0 ax             12m53s          1237091    1222130    4062       4241
[admin@MikroTik] ip hotspot active>
[admin@MikroTik] ip hotspot cookie>
HotSpot active HTTP cookie list
    find  Find active HTTP cookie
   print  Show active HTTP cookie list
  remove  Remove active HTTP cookie
     get  Get active HTTP cookie properties
[admin@MikroTik] ip hotspot cookie> print
  # USER                                 MAC-ADDRESS       EXPIRES-IN
  0 ex                                   00:30:4F:13:BF:EF 2d23h56m56s
[admin@MikroTik] ip hotspot cookie>
Cookies can be listed and removed. They can not be changed or added manually.
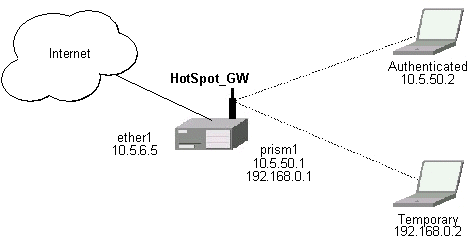
There will be 2 hotspot IP address ranges used for clients on prism1 interface. You are free to choose the address ranges, just make sure you use masquerading for not routed ones. In our example, we are using
Temporary addresses are given out by DHCP server (configured within /ip dhcp-server), but real addresses are given out by hotspot dhcp configuration.
For hotspot client accounting, hotspot will add dynamic firewall rules in firewall hotspot chain. This chain has to be created manually. And all network packets (to/from hotspot clients) have to pass this chain.
Follow the steps below:
/interface prism set prism1 arp=reply-only
/ip address add address=192.168.0.1/24 interface=prism1
/ip address add address=10.5.50.1/24 interface=prism1
/ip pool add name=temp ranges=192.168.0.2-192.168.0.254
/ip pool add name=hspot ranges=10.5.50.2-10.5.50.254
/ip firewall src-nat add src-address=192.168.0.0/24 action=masqueradeMake sure you have routing for authenticated address space. Try to ping 10.5.50.1 from your internet gateway 10.5.6.1, for example. See the Basic Setup Guide on how to set up routing.
/ip dhcp-server add name="hs_temp" interface=prism1 lease-time=14s \
    address-pool=temp netmask=255.255.255.0 gateway=192.168.0.1 \
    dns-server=159.148.60.2,159.148.108.1 domain="mt.lv" add-arp=yes disabled=no
/ip hotspot server add name=hs_dhcp dhcp-server=hs_temp address-pool=hspot \
    netmask=255.255.255.0 gateway=10.5.50.1
/ip hotspot user add name=ax password=ex
/ip service set www port=8081
/ip service set hotspot port=80
Note! Changing www service to other port than 80 requires thet you specify the new port when connecting to MikroTik router using WinBox, e.g., use 10.5.50.1:8081 in this case.
/ip firewall dst-nat add src-address=192.168.0.0/24 protocol=tcp action=redirect \
    to-dst-port=80 comment="redirect unauthorized hotspot clients to hotspot service"
/ip firewall rule forward add src-address=192.168.0.0/24 protocol=icmp
/ip firewall rule forward add src-address=192.168.0.0/24 protocol=udp\
    dst-port=53
/ip firewall rule forward add src-address=192.168.0.0/24 action=reject\
    comment="reject access for unauthorized hotspot clients"
/ip firewall add name=hotspot
/ip firewall rule forward add action=jump jump-target=hotspot
[admin@HotSpot_GW] > ip dhcp-server lease print
Flags: X - disabled, D - dynamic, H - hotspot
  #    ADDRESS         MAC-ADDRESS       EXPIRES-A... SERVER                 STATUS
  0 D  192.168.0.254   00:40:96:13:B3:47 8s           hs_temp                bound
[admin@HotSpot_GW] >
After successful authentication its DHCP address is changed, and it is listed under active hotspot users:
[admin@HotSpot_GW] > ip dhcp-server lease print
Flags: X - disabled, D - dynamic, H - hotspot
  #    ADDRESS         MAC-ADDRESS       EXPIRES-A... SERVER                 STATUS
  0 DH 10.5.50.2       00:40:96:13:B3:47 56s          hs_temp                bound
[admin@HotSpot_GW] > ip hotspot active print
  # USER                ADDRESS         UPTIME          SESSION-TIMEOUT IDLE-TIMEOUT
  0 ax                  10.5.50.2       2m25s
[admin@HotSpot_GW] > /ip hotspot active print stats
  # USER                UPTIME          BYTES-IN   BYTES-OUT  PACKETS-IN PACKETS-OUT
  0 ax                  13m26s          145268     264282     475        494
[admin@HotSpot_GW] >
User statistics show accumulated values prior to current session.
[admin@HotSpot_GW] > ip hotspot user print stats
Flags: X - disabled
  #   NAME              UPTIME          BYTES-IN   BYTES-OUT  PACKETS-IN PACKETS-OUT
  0   ax                6m29s           9896       31156      80         77
[admin@HotSpot_GW] >
User statistics values are updated after current session is closed. Values can be reset to '0' using the reset command.
/ip firewall dst-nat add src-address=10.5.50.0/24 dst-port=25 protocol=tcp\
to-dst-address=10.5.6.100 action=nat\
comment="Translate SMTP TCP 25 port to our mail server"
1) in dst-nat: don't redirect requests going to your web server (x.x.x.x:80) (this rule has to be before "redirect to hotspot service" rule!)
/ip firewall dst-nat add dst-address=x.x.x.x/32 dst-port=80 protocol=tcp\
    action=accept
2) in forward chain: accept requests going to your web server (this rule has to be before "reject access for unauthorized hotspot clients" rule!)
/ip firewall rule forward add dst-address=x.x.x.x/32 dst-port=80 protocol=tcp\
    action=accept
1) make sure, web-proxy package is installed;
2) it is assumed, that HotSpot is set up and successfully running.
Hotspot clients are connected on interface named 'prism1'.
3) set up web-proxy to run on port 3128 using transparent mode:
/ip web-proxy set enabled=yes address=0.0.0.0:3128 transparent-proxy=yes
4) set up HotSpot to use one of router's local IP addresses (10.5.50.1):
/ip hotspot set hotspot-address=10.5.50.1
5) redirect all requests from hotspot interface to port 80 (except to 10.5.50.1), to web-proxy:
/ip firewall dst-nat add in-interface=prism1 dst-address=!10.5.50.1/32 dst-port=80\
    protocol=tcp action=redirect to-dst-port=3128 comment="transparent proxy"
Now, everything should be working. Only traffic of redirected requests to web-proxy will not be accounted. It's because this traffic will not pass through the forward chain.
6) to enable accounting for user traffic to/from transparent web-proxy, additional firewall rules should be added:
/ip firewall rule input add in-interface=prism1 dst-port=3128\
    protocol=tcp action=jump jump-target=hotspot\
    comment="account traffic from hotspot client to transparent web-proxy"
/ip firewall rule output add src-port=3128 protocol=tcp\
    out-interface=prism1 action=jump jump-target=hotspot\
	comment="account traffic from transparent web-proxy back to hotspot client"
/ip hotspot profile set default only-one=yes
/ip dns-cache set dns-server=159.148.60.2 enabled=yes
/ip dhcp-server set hs_temp dns-server=10.5.50.1,159.148.108.1
Common variables (available in all pages):
<a href="%link_login%">login</a>It can be used in any hotspot HTML file.
Note, that to insert % symbol as a text (not as a part of variable construction), "%%" has to be used (if there is only one % symbol on a page or string between it and next % symbol is not a valid variable name, % may be used with the same result).
<input type="text" %input_user%>to this line:
<input type="hidden" name="user" value="hsuser">(where hsuser is the username you are providing)
<input type="password" %input_password%>to this line:
<input type="hidden" name="password" value="hspass">(where hspass is the password you are providing)
https://www.server.serv/register.html?mac=XX:XX:XX:XX:XX:XXchange the Login button link to:
https://www.server.serv/register.html?mac=%mac%(you should correct the link to point to your server)