MikroTik RouterOS Point to Point Tunnel Protocol (PPTP)
Document revision 27-Apr-2002This document applies to the MikroTik RouterOS V2.4 and 2.5
Overview
PPTP (Point to Point Tunnel Protocol) supports encrypted tunnels over IP. The MikroTik RouterOS implementation includes a PPTP client, a PPTP dynamic server, and a PPTP static server. The following tunnels are supported:- MikroTik RouterOS client to any PPTP server – for example Windows 2000
- MikroTik RouterOS client to MikroTik RouterOS static or dynamic server
- MikroTik RouterOS dynamic server to multiple MikroTik RouterOS clients and any clients with PPTP support
- MikroTik RouterOS static server to MikroTik RouterOS client or any PPTP client
- For secure router-to-router tunnels over the Internet
- To link local Intranets or LANs (when EoIP is also used)
- For Windows clients to remotely access an Intranet/LAN of a company (see PPTP setup for Windows for more information)
- For 'Mobile IP' – get your company's IP when connected to third party Internet connections
Contents of the Manual
The following topics are covered in this manual:- Installation
- Hardware Resource Usage
- PPTP Protocol Description
- PPTP Client Setup
- PPTP Dynamic Server Setup
- PPTP Static Server Setup
- Troubleshooting
- PPTP Router-to-Router Secure Tunnel Example
- PPTP Setup for Windows
- Additional Resources
Installation
The 'pptp-2.x.x.npk' (less than 160KB) package and the 'ppp-2.x.x.npk' (less than 370KB) are required. The package can be downloaded from MikroTik’s web page www.mikrotik.com. To install the packages, please upload them to the router with ftp and reboot. You may check to see if the PPTP and PPP packages are installed with the command:
[MikroTik] > system package print
  # NAME                   VERSION               BUILD-TIME           UNINSTALL
  0 aironet                2.4                   sep/25/2001 05:08:05 no
  1 pptp                   2.4                   sep/25/2001 05:06:44 no
  2 ppp                    2.4                   sep/25/2001 05:06:35 no
  3 pppoe                  2.4                   sep/25/2001 05:06:45 no
  4 ssh                    2.4                   sep/25/2001 05:08:11 no
  5 routing                2.4                   sep/25/2001 05:06:07 no
  6 snmp                   2.4                   sep/25/2001 05:06:09 no
  7 moxa-c101              2.4                   sep/25/2001 05:08:08 no
  8 framerelay             2.4                   sep/25/2001 05:08:56 no
  9 system                 2.4                   sep/25/2001 05:05:48 no
[MikroTik] >
Lines one and two show that the PPP and PPTP packages are installed.
Hardware Resource Usage
PPTP uses a minimum amount of memory. RouterOS V2.4 and V2.5 have a re-written PPTP
engine that encrypted throughput approximately 60Mb/s on a Celeron 600MHz CPU.
PPTP Protocol Description
Though the following may sound complex, our implementation of PPTP
is easy to setup and manage. PPTP, using PPP, is a secure tunnel for
transporting IP traffic. PPTP encapsulates PPP in virtual lines that run over IP.
PPTP incorporates PPP and MPPE (Microsoft Point to Point Encryption)
to make encrypted links. The purpose of this protocol is to make well-managed
secure connections between 1) routers and routers 2) routers and Windows clients
(or other OS with PPTP support).
PPTP includes PPP authentication and accounting for each PPTP connection. Full authentication and accounting of each connection may be done through a RADIUS client or locally. There are also additional PPP configurations for management of users and connections.
MPPE 40bit RC4 and MPPE 128bit RC4 encryption are supported.
PPTP traffic uses TCP port 1723 and IP protocol ID 47, as assigned by the Internet Assigned Numbers Authority (IANA). PPTP can be used with most firewalls and routers by enabling traffic destined for TCP port 1723 and protocol 47 traffic to be routed through the firewall or router.
PPTP connections may be limited or impossible to setup though a
masqueraded/NAT IP connection. Please see the Microsoft and RFC links
at the end of this section for more information.
PPTP Client Setup
Each PPTP connection is composed of a server and a client.
The MikroTik RouterOS may function as a server or client –
or for various configurations, it may be the server for
some connections and client for other connections.
For example, the client created below could connect to a Windows 2000 server,
another MikroTik Router, or another router which supports a PPTP server.
The PPTP client management can be accessed under the /interface pptp-client submenu.
You can add a PPTP client using the add command:
[MikroTik] interface pptp-client>
add name=test2 connect-to=10.1.1.12 encryption=required \
user=john add-default-route=yes
[MikroTik] interface pptp-client> print
Flags: X - disabled
  0 X name=test2 user=john connect-to=10.1.1.12 mtu=1460 mru=1460 pap=no
      chap=no ms-chapv2=yes idle-timeout=0s session-timeout=0s
      encryption=required add-default-route=yes

[MikroTik] interface pptp-client> enable 0
[MikroTik] interface pptp-client> monitor test2
      uptime: 0s
    encoding:
      status: Terminated

[MikroTik] interface pptp-client>
Descriptions of settings:
name - Interface name for reference
mtu - Maximum Transmit Unit. Should be set to the default 1460 bytes to avoid fragmentation of packets. May be set to 1500bytes if mtu path discovery is not working properly on links.
mru - Maximum Receive Unit. Should be set to the default 1460 bytes to avoid fragmentation of packets. May be set to 1500bytes if mtu path discovery is not working properly on links.
connect-to - The IP address of the PPTP server to connect to.
pap, chap, ms-chapv2 - (no / yes). Authentication protocol. Encrypted links are only supported when ms-chapv2 is selected. This is a feature of the protocol. It is suggested that pap and chap always be set to 'no', unless there is a special situation which requires an unencrypted link.
encryption - (none / optional / required / stateless). Will only work in encrypted mode when ms-chapv2 authentication is used. For most links, it should be set to 'required'.user - User name to use when logging on to the remote server. The user with ppp group privileges and a password must be added to the client router’s user database. When the client is being authenticated by the server, the client will send this user and the password from the client router’s user database. The server user database must have the same user and password and PPP group attribute to authenticate the link.
- none – no encryption
- optional – 40bit or 128bit if server requests this
- required – 40bit or 128bit if server agrees, link will be shut down if no agreement
- non-stateless (cannot be selected) – key is changed approximately every hour or depending on traffic
- stateless – same as required plus key is changed for every packet. If stateless is not supported by the other end, then non-stateless is used
idle-timeout - The link will be terminated if there is no activity with-in the time set – in seconds. When set to '0', there is no timeout.
session-timeout - The maximum time the connection can stay up. When set to '0', there is no timeout.
add-default-route - When the PPTP connection is up, the default route (gateway) will be added using as gateway the other side of the PPP link.
If the PPTP client is configured properly and it has established a connection to the server, you can:
- Monitor the connection using the /interface pptp-client monitor command
- See the pptp-out interface under the /interface print list
- See the dynamic IP address under the /ip address print list
- (Optionally) See the dynamic default route under the /ip route print list
[MikroTik] interface pptp-client> monitor test2
      uptime: 4h35s
    encoding: MPPE 128 bit, stateless
      status: Connected
[MikroTik] interface pptp-client>
Description of display:
uptime - Connection time displayed in days, hours, minutes, and seconds.
encoding - Encryption being used in this connection.
status - The status of this client may be:
- Dialing – attempting to make a connection
- Verifying password... - connection has been established to the server, password verification in progress.
- Connected – self-explanatory
- Terminated – interface is not enabled or the other side will not establish a connection
PPTP Dynamic Server Setup
The router supports one PPTP dynamic server. This server supports unlimited connections from clients. For each current connection, a dynamic interface is created. While the PPTP dynamic server supports multiple clients, it does not support static routes, filters, and other IP level features that need to be attached to static interfaces. The PPTP static server supports routes and other IP level features.The PPTP dynamic server management can be accessed under the /interface pptp-dynamic-server server submenu.
You can enable the PPTP dynamic server using the set command:
[MikroTik] interface pptp-dynamic-server server>
set enabled=yes encryption=required \
local-address=10.5.17.254 remote-address=10.5.17.1-10.5.17.50
[MikroTik] interface pptp-dynamic-server server> print
            enabled: yes
                mtu: 1460
                mru: 1460
                pap: no
               chap: no
          ms-chapv2: yes
      local-address: 10.5.17.254
     remote-address: 10.5.17.1-10.5.17.50
       idle-timeout: 0s
    session-timeout: 0s
         encryption: required
[MikroTik] interface pptp-dynamic-server server>
Descriptions of settings:
enabled - (yes / no). Enable or disable the server.
mtu - Maximum Transmit Unit. Should be set to the default 1460 bytes to avoid fragmentation of packets. May be set to 1500bytes if mtu path discovery is not working properly on links.
mru - Maximum Receive Unit. Should be set to the default 1460 bytes to avoid fragmentation of packets. May be set to 1500bytes if mtu path discovery is not working properly on links.
local-address - The IP address or range of the PPTP local server. If address, the same local server address will be used on all connections that are created.
remote-address - This should be set to an IP range. This may limit the number of current connections if there are no free IPs available when a new connection is initiated.
pap, chap, ms-chapv2 - (no / yes). Authentication protocol. Encrypted links are only supported when ms-chapv2 is selected. This is a feature of the protocol. It is suggested that pap and chap always be set to 'no', unless there is a special situation which requires an unencrypted link.
encryption - (none / optional / required / stateless). Will only work in encrypted mode when ms-chapv2 authentication is used. For most links, it should be set to 'required'.idle-timeout - The link will be terminated if there is no activity with-in the time set – in seconds. When set to '0', there is no timeout.
- none – no encryption
- optional – 40bit or 128bit if server requests this
- required – 40bit or 128bit if server agrees, link will be shut down if no agreement
- non-stateless (cannot be selected) – key is changed approximately every hour or depending on traffic
- stateless – same as required plus key is changed for every packet. If stateless is not supported by the other end, then non-stateless is used
session-timeout - The maximum time the connection can stay up. When set to '0', there is no timeout.
If the PPTP dynamic server is configured properly and it has established connections with the clients, you can:
- See the list of connected clients using the /interface pptp-dynamic-server print command
- Monitor the connected clients using the /interface pptp-dynamic-server monitor command
- See the pptp-in-dyn interfaces under the /interface print list
- See the dynamic IP addresses under the /ip address print list
- See the dynamic routes under the /ip route print list
PPTP Static Server Setup
The PPTP static server is made for permanent connections between two routers. One side of the PPTP tunnel must be set up as a static server and the other side as a client. On both the static server side and the client side, it will be possible to add static routes, filters, and any other IP level features – for example an EoIP tunnel may be put on top of the PPTP encrypted tunnel to make an encrypted LAN-to-LAN bridge.The PPTP static server management can be accessed under the /interface pptp-static-server submenu.
To add a PPTP static server interface use the add command:
[MikroTik] interface pptp-static-server>
add name=test remote-address=1.1.1.2 local-address=1.1.1.1 \
client-address=10.1.1.13 mtu=1500 mru=1500 encryption=required
[MikroTik] interface pptp-static-server> print
Flags: X - disabled
  0 X name=test client-address=10.1.1.13 mtu=1500 mru=1500 pap=no chap=no
      ms-chapv2=yes local-address=1.1.1.1 remote-address=1.1.1.2
      idle-timeout=0s session-timeout=0s encryption=required

[MikroTik] interface pptp-static-server> enable test
[MikroTik] interface pptp-static-server> monitor test
        user: john
      uptime: 5s
    encoding: MPPE 128 bit, stateless
[MikroTik] interface pptp-static-server>
Descriptions of settings:
name - Interface name for reference
client-address - This should be set to the IP address of the client that will attempt to make a PPTP connection.
mtu - Maximum Transmit Unit. Should be set to the default 1460 bytes because of the PPTP overhead, since packet fragmentation is avoided. May be set to 1500 bytes when working with MikroTik clients, if mtu path discovery is not working properly on links. Should be set to 1460 to work with non-MikroTik clients. When set to 1500, there will be no MTU problems which can come up when communicating with mis-configured networks.
mru - Maximum Receive Unit. Should be set to the default 1460 bytes because of the PPTP overhead, since packet fragmentation is avoided. May be set to 1500 bytes when working with MikroTik clients, if mtu path discovery is not working properly on links. Should be set to 1460 to work with non-MikroTik clients. When set to 1500, there will be no MTU problems which can come up when communicating with mis-configured networks.
local-address - The IP address of the PPTP local server. The same local server address can be used on multiple static sever interfaces.
remote-address - This should be set to an IP address that will be given to the remote client.
pap, chap, ms-chapv2 - (no / yes). Authentication protocol. Encrypted links are only supported when ms-chapv2 is selected. This is a feature of the protocol. It is suggested that pap and chap always be set to 'no', unless there is a special situation which requires an unencrypted link.
encryption - (none / optional / required / stateless). Will only work in encrypted mode when ms-chapv2 authentication is used. For most links, it should be set to 'required'.idle-timeout - The link will be terminated if there is no activity with-in the time set – in seconds. When set to '0', there is no timeout.
- none – no encryption
- optional – 40bit or 128bit if server requests this
- required – 40bit or 128bit if server agrees, link will be shut down if no agreement
- non-stateless (cannot be selected) – key is changed approximately every hour or depending on traffic
- stateless – same as required plus key is changed for every packet. If stateless is not supported by the other end, then non-stateless is used
session-timeout - The maximum time the connection can stay up. When set to '0', there is no timeout.
If the PPTP static server is configured properly and it has established a connection with the client, you can:
- Monitor the connection using the /interface pptp-static-server monitor command
- See the pptp-in interface under the /interface print list
- See the dynamic IP address under the /ip address print list
- See the dynamic route under the /ip route print list
Troubleshooting
- I use firewall and I cannot establish PPTP connection
Make sure the TCP connections to port 1723 can pass through both directions between your sites. Also, IP protocol 47 should be passed through. - I use OSPF and PPTP. The router locks up just after PPTP connection
is made and routing information exchanged between the routers.
This is an internal loop problem, when the new routing information changes the route to the PPTP client or server. This can be avoided by adding static routes at both routers, which have destination address of the other router. See the application example below and the note for OSPF and RIP users.
PPTP Router-to-Router Secure Tunnel Example
The following is an example of connecting two Intranets using an encrypted PPTP tunnel over the Internet.
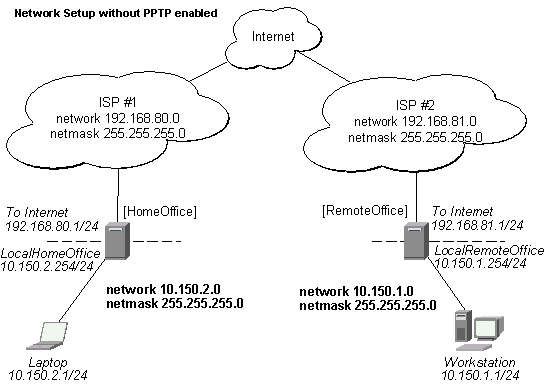
There are two routers in this example:
- [HomeOffice]
Interface LocalHomeOffice 10.150.2.254/24
Interface ToInternet 192.168.80.1/24 - [RemoteOffice]
Interface ToInternet 192.168.81.1/24
Interface LocalRemoteOffice 10.150.1.254/24
Each router is connected to a different ISP. One router can access another router through the Internet.
To add a secure Tunnel between the HomeOffice and RemoteOffice routers, add an identical user and password with the group 'ppp' to both the HomeOffice and RemoteOffice router:
[RemoteOffice] user> add name remote password remote group ppp
[HomeOffice] user> add name remote password remote group ppp
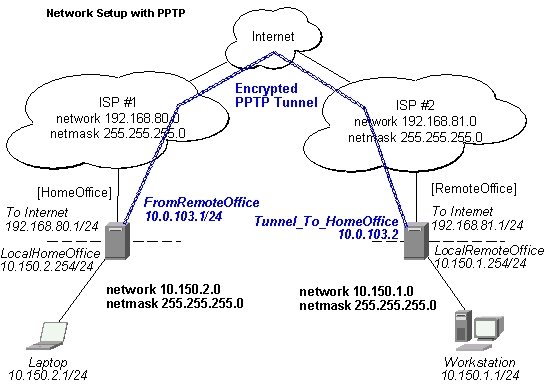
Add a PPTP static server interface to the HomeOffice router:
[HomeOffice] interface pptp-static-server> print
0   name: FromRemoteOffice client-address: 192.168.81.1 pap: no chap: no
    ms-chapv2: yes encryption: required mtu: 1460 mru: 1460 idle-timeout: 0
    session-timeout: 0 local-address: 10.0.103.1 remote-address: 10.0.103.2
Add a PPTP client to the RemoteOffice router:
[RemoteOffice] interface pptp-client> print
0   name: Tunnel_To_HomeOffice mtu: 1460 mru: 1460 pap: no chap: no
    ms-chapv2: yes encryption: required user: remote connect-to: 192.168.80.1
    idle-timeout: 0 session-timeout: 0
Thus, a PPTP tunnel is created between the routers. This tunnel is like an Ethernet point-to-point connection between the routers with IP addresses 10.0.103.1 and 10.0.103.2 at each router. It enables 'direct' communication between the routers over third party networks.
To route the local Intranets over the PPTP tunnel – add these routes:
[HomeOffice] > ip route add dst-address 10.150.1.0/24 gateway 10.0.103.2
[RemoteOffice] > ip route add dst-address 10.150.2.0/24 gateway 10.0.103.1
Test the PPTP tunnel connection:
[RemoteOffice]> /ping 10.0.103.1
10.0.103.1 pong: ttl=255 time=3 ms
10.0.103.1 pong: ttl=255 time=3 ms
10.0.103.1 pong: ttl=255 time=3 ms
ping interrupted
3 packets transmitted, 3 packets received, 0% packet loss
round-trip min/avg/max = 3/3.0/3 ms
Test the connection through the PPTP tunnel to the LocalHomeOffice interface:
[RemoteOffice]> /ping 10.150.2.254
10.150.2.254 pong: ttl=255 time=3 ms
10.150.2.254 pong: ttl=255 time=3 ms
10.150.2.254 pong: ttl=255 time=3 ms
ping interrupted
3 packets transmitted, 3 packets received, 0% packet loss
round-trip min/avg/max = 3/3.0/3 ms
Note for OSPF and RIP users! Router can lock up, if using OSPF or RIP with the PPTP. It is caused by internal loop, which results from the new routing information, which is obtained through the OSPF or RIP, when the PPTP connection is established.To avoid this, two static routes should be added to each of the routers before creating the PPTP tunnel:
[HomeOffice] > ip route add dst-address 192.168.81.1/32 gateway 192.168.80.254
[RemoteOffice] > ip route add dst-address 192.168.80.1/32 gateway 192.168.81.254
To bridge a LAN over this secure tunnel, please read the 'EoIP' section of the manual. To set the maximum speed for traffic over this tunnel, please the 'Queues' section.
PPTP Setup for Windows
Microsoft provides PPTP client support for Windows NT, 2000, ME, 98se, and 98.
Windows 98se, 2000, and ME include support in the Windows setup or automatically install PPTP.
For 95, NT, and 98, installation requires a download from Microsoft.
Many ISPs have made help pages to assist clients with Windows PPTP installation.
A zipped download of an instructional web page is available in PPTP_client_files.zip –
this can be found in the utilities section of the download section.
This zipped file also includes files needed from Microsoft for upgrading Windows 95 and 98 to support PPTP.
Links:
http://www.real-time.com/Customer_Support/PPTP_Config/pptp_config.html
http://www.microsoft.com/windows95/downloads/contents/WUAdminTools/S_WUNetworkingTools/W95WinsockUpgrade/Default.asp
Sample instructions for PPTP (VPN) installation and client setup – Windows 98se
If the VPN (PPTP) support is installed, select 'Dial-up Networking' and 'Create a new connection'. The option to create a 'VPN' should be selected. If there is no 'VPN' options, then follow the installation instructions below. When asked for the 'Host name or IP address of the VPN server', type the IP address of the router. Double-click on the 'new' icon and type the correct user name and password (must also be in the user database on the router or RADIUS server used for authentication).
The setup of the connections takes nine seconds after selection the 'connect' button. It is suggested that the connection properties be edited so that 'NetBEUI', 'IPX/SPX compatible', and 'Log on to network' are unselected. The setup time for the connection will then be two seconds after the 'connect' button is selected.
To install the 'Virtual Private Networking' support for Windows 98se,
go to the 'Setting' menu from the main 'Start' menu. Select 'Control Panel',
select 'Add/Remove Program', select the 'Windows setup' tab,
select the 'Communications' software for installation and 'Details'.
Go to the bottom of the list of software and select 'Virtual Private Networking' to be installed.
Additional Resources
Links for PPTP documentation:
http://msdn.microsoft.com/library/backgrnd/html/understanding_pptp.htm
http://support.microsoft.com/support/kb/articles/q162/8/47.asp
http://www.ietf.org/rfc/rfc2637.txt?number=2637
http://www.ietf.org/rfc/rfc3078.txt?number=3078
http://www.ietf.org/rfc/rfc3079.txt?number=3079
© Copyright 1999-2002, MikroTik